Wednesday, June 7, 2023

Traveling with Tiny Humans and NO Electronics!

I don't claim to be a parenting genius and I know much of my luck traveling with kids is just that....luck.  I will say my kids are their best selves strapped into a car seat.  I don't have a clue why.  I keep them entertained but I do not give them electronics.  It was just a choice I made early on when I had one kid.  I solo parent and realize I could not safely turn on a movie and hand it to a kid while hurtling my vehicle down the road.  So.....no electronics.  My kids are now 6 and 4 and they don't even ask for their iPad in the car.  Also, please don't tell them that most kids probably get them :)  

Our typical car trip is 4-6 hours as that is how long it takes us to get to a major city.  We drove from Oregon to Moab, Utah over spring break and we had zero issues in the car.  I had plenty of activities to keep them entertained.

I swear by a couple of products and what you do with them is up to you, but I'll share what works for us.  

Car Organization:

Lap tray:  Hands down the best invention ever!  These are sturdy, have lots of compartments and most importantly, have a lip so stuff doesn't fall off.  Our are several years old, get frequent use and besides the coloring on them, look brand new.  https://amzn.to/42lNkXz

Gear organizer:  I've had a different one for years and just upgraded to this one.  Here is why I like it - dividers.  We have one large section in back and then each kid has a bin for their specific stuff.  https://amzn.to/43JXPoB

Seat back organizers:  They are nice for holding things like sunglasses, tissue, bottles, etc., but we don't use them as much as the other items.  We leave these in the car all the time, and they are super handy to keep things off the floor.  https://amzn.to/43LlnJH

Boxes:  Ours are from Daiso, but you can find plenty of options on Amazon.  Look for a flat surface for writing, hinged and preferably one latch.  I wouldn't get one with a clipboard either, since you want it to store flat.  Fill with blank paper books, coloring books, stickers, etc.  https://amzn.to/3WQJQuZ

Crayon/marker boxes: Hear me when I say this.  DO NOT get one that simply snaps shut - it will not stay shut in the car.  You need a latch.  I also wouldn't get one with a lid that removes completely only to fall to the floor - hinged is key - https://amzn.to/3OWmhir

Plastic folders: This is pro level - one for all the activities - one for the sewing, one for the stickers, one for the special activities.  One, it slows kids down, helps them learn organization and makes it easy for you to simply pass back a new activity if needed.  I prefer snaps to velcro closure, but it doesn't really matter.   https://amzn.to/3WQXTke


Favorite Car Activities:

Boogie Board:  I really wish these were around when I was a kid!  They are so fun.  These have a lock screen toggle on the back so brother can't just reach over and delete your work (no sibling would EVER do that right!!).  https://amzn.to/3qzFNa7

Magnetic Storyboxes:  What a hit - we have four of these now and they get plenty of playtime.  I love that it's self contained, and magnets aren't as prone to getting lost.  If a piece gets dropped, it's usually attached to the car seat somewhere.  https://amzn.to/3WV2K3C

Travel Tangram:  These are amazing!  The attached book has colored instructions to make all different shapes.  It also has just the shape for the kids to see if they can figure out how to build on their own.  Hours of entertainment here!  https://amzn.to/3MWG26C

Melissa and Doug Reusable Stickers:  These ones are small and work perfectly when placed in a small plastic folder.  Use these over and over again and the folders are double sided so kids have two scenes to choose from.  https://amzn.to/3MULE1f   or  https://amzn.to/3MULE1f (if you have mermaid obsessed people like at my house).

Matching Game:  Again - magnets!  I did get some peel and stick magnetic sheets to cut up and put on the back.  I wanted both sides to be magnetic so they didn't fall while being passed back and forth.  https://amzn.to/43F7wV6

Paint with Stickers:  So fun - match the numbered sticker to the picture - like paint by number but vehicle and sanity friendly :)  https://amzn.to/3WWLLOo  https://amzn.to/3P5w4Tv

Tape Activity Book:  Highly recommend for the older kids.  My four year old enjoyed this but had a hard time tearing the tape by herself.  My six year old loved it.  https://amzn.to/3CeKoRP

Magnetic tic tac toe:  You are getting the idea!  These little tins are super easy to pack and being self contained means I love them!  https://amzn.to/3CeKoRP

Sewing Cards:  These keep my kids occupied for a surprising length of time.  When they get tired of lacing, they use them as fishing poles and other creative things.  https://amzn.to/43LlnJH

Water Wow:  These have long been a favorite for us.  I take the pens off so they store flat and I keep the pens and pass them back when the kids are ready - otherwise they can leak.  https://amzn.to/3oKF99x

Wipe Clean Books:  We love dry erase and IMO the Usborne books are the gold standard.  https://amzn.to/445bcQz  https://amzn.to/445bAP1  (Do yourself a favor and support a small business - find an Usborne consultant in your area)

Sticker Faces:  These never get old.  The kids make hilarious faces!  https://amzn.to/45Op8Qr


Most of these also work great as a grab and go for places like church, the doctors office, or any place you will be waiting with kiddos and you want to try to limit the electronics.  Let's be honest....I usually bring the pads to those places as a back up :)

Tell me your favorite travel tricks with kids in the comments!!

Tuesday, December 1, 2020

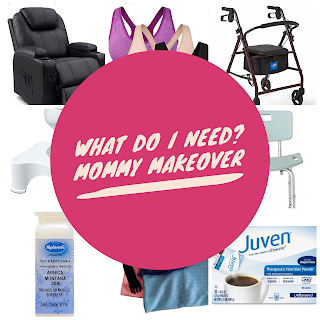
Mommy Makeover - What Do I Need?

When I was prepping for surgery, I thought it was so overwhelming what I needed and what I didn’t. My surgeon basically said I needed nothing. I joined several facebook groups where people gave a ton of amazing suggestions, but I found I was spending forever searching through posts. In an effort to hopefully save someone else the same agony, I’ve compiled everything I used into this list with links and my thoughts. Hope it’s helpful for someone! I had an ETT, breast reduction and lipo to the flanks. I’m no expert, this is just my experience.

LIFT CHAIR – I went back and forth on this. I looked into renting, but the price wasn’t much less and I wasn’t sure how long I would need the chair to sleep in.  Some people say they sleep in them for 6-8 weeks.  I also didn’t really want to introduce someone else’s germs into my house. I ended up purchasing.  A twin sheet worked perfectly (flannel so I didn't slide all over).  I didn't have any fluid leaking issues, but it would be easy enough to put down an absorbent pad / wipe up any messages. There is absolutely no way I could have gotten in and out of my bed for at least a week or so. I slept in this for about 2 weeks and then went back and forth on nights that I couldn't sleep for a few more weeks. It’s super comfy and I liked the warming feature. The “massage” is really just more of a vibration. I had planned to sell it, but it's so comfy that I'm keeping it. My only complaint is that I wish the legs went up a tad higher, that's why I got the knee pillow below. https://amzn.to/2J26Y7I

WALKER – I couldn’t have functioned for the first 3-4 days without it. My back hurt so bad when standing (for weeks) and I liked having the seat to sit on at the sink, or when I needed to stop and rest.  I even took little granny walks around the neighborhood with it. My surgeon wrote me a prescription and my insurance covered it from a medical supply store so be sure to check on that first. Mine was very similar to this one for reference. https://amzn.to/3lYJH5w

KNEE PILLOW - I put this pillow under my knees in the chair. When I slept, I put another pillow on top of it. I could adjust it as needed for comfort. https://amzn.to/3friFkO

SHOWER CHAIR – I love mine and am still using it 6 wpo because I still get pretty tired sometimes. I am thankful I had a back on mine. I could shower right away so that might make a difference if you need/want one. https://amzn.to/3fqoyym

TOILET SEAT RISER – I was beyond thankful this for the first week. I would have really struggled without it. No need for handles, but I was glad I didn’t have to get all the way down and all the way up. https://amzn.to/3383kAK

DRAIN POUCHES – I debated about these and ultimately was glad I did it. My surgeon sent me home with a lanyard, but I had 4 drains, so it was bulky with them all together. I cut holes in the pockets of my night gowns for my TT drains and used this for the breast ones. It made them easy to sort out when I emptied, and they never really bugged me. https://amzn.to/2HoLl12

NECK PILLOW – A must have for sleeping in a chair. I got this at the last second and thank goodness I did. https://amzn.to/3pRjGY6

BRAS – Grabbed these for post op. I didn’t need compression. https://amzn.to/372m5Xl

NIGHTGOWN - I wore this with a robe and slippers on surgery day. I also lived in nightgowns for a couple weeks. I recommend button down with pockets. I had one with long sleeves I liked a little better but it’s not on amazon anymore. https://amzn.to/3fnQliZ

ARNICA – I went through two bottles of this. 4 tablets, 4 times a day. https://amzn.to/2Hvzcrm

JUVEN – This is expensive. I debated it but went ahead. I ended up in wound care a couple of weeks in when my body rejected the stitches and wound care recommended I start this and were surprised and happy I had been taking it all along. I only tried the unflavored. It’s best mixed with a citrus juice like pineapple juice or with crystal light. https://amzn.to/2KmfL59

BROMELAIN – https://amzn.to/2KrhB4J

LOOFAH ON A STICK – reach your legs and back. Nice to have - not a must have https://amzn.to/335T4bY

GRABBER – I dropped a million things and no way I was able to pick them up. https://amzn.to/2UR09Ja

SQUATTY POTTY – Never had one of these until I tried to poop post surgery. Horrific doesn’t describe it. Do yourself a favor and grab one. I now think it's the greatest thing since sliced bread. https://amzn.to/3nQJxh5

I also made a meds chart to track what I was taking and when for the first week. It was super helpful since I had several things that all had to be taken at different intervals.


Tuesday, November 24, 2020

My Mommy Makeover Begins

I never thought I would be the type of woman to undergo plastic surgery.  I've never had a problem with people who do, I just have always been comfortable in my own skin.  Then I gained a bunch of weight.  Then I had two babies which included gaining about 60lbs with the first one.  After babies, I committed to getting back into shape.  With encouragement and support from Fit4Mom Stroller Strides and Body Back programs (now Body Well), I lost 50 lbs with good eating habits and exercise.  I was still unhappy.  I still had a long way to go to get to my goals and my progress was hindered.  My breasts have always been huge.  My knickname was S**** DD.....in the FIFTH grade!  I've endured years of back pain.  Pregnancy made my breasts even larger and losing weight did nothing to make them shrink.  At the time of my surgery, I was a 38H!  I've also always had "the family pooch."  My grandma still had it in her 90's and I have joked for years that after kids I was having that sucker removed.  Pregnancy made it a giant apron and no amount of exercise would ever fix that damaged skin and tissue.  

First I decided to have a breast reduction.  I was certain I could get my insurance to cover it.  Since I was having a consultation anyway, I figured I would ask about a tummy tuck as well.  Ultimately, I decided if I was ever going to do it, now would be the time.  One surgery, one recovery.  I also decided to have liposuction on my flanks at the last minute to make sure I was happy with the final look.  I never felt pressured by my plastic surgeon to add more, and in fact, I had to ask about the lipo.

Surgery day came and went.  I'm in the throws of recovery now, just six weeks post op.  My body has rejected some of the stitches and I have open wounds on my stomach.  I'll heal just fine with help from my surgeon and wound care, it's just taking extra time.  I'm starting to feel human again, day by day, I feel better and better.  

I had two c-sections.  I never thought they were a big deal.  I didn't need narcotics during recovery and I was up and walking the same day after both.  The mommy makeover is no joke.  I needed a TON of help.  I needed more help than I have ever needed for anything.  I needed more help than I was comfortable asking for or accepting.  I'm in awe of women who do this completely alone.  I had my mom and cousins help me for the first few weeks and I couldn't have done it without them. 

Friday, September 9, 2016

Organized Baby Closet - Ikea Hack


In an effort to be more organized I decided to spend a weekend building some affordable storage solutions.

I purchased 3 Kallax shelves from Ikea:
  • Two 1x4 cubes
  • One 2x2 cubes
Also purchased 3 adjustable clothing bars, bar wall brackets and laminate boards to make a top shelf from the hardware store.

After putting together the Ikea shelves, I put one of the 1x4 cubes horizontal on the ground.  I put the second 1x4 vertical on one end of the horizonal shelf.  Screw the shelves together so there is no risk of tipping or moving.

I positioned the new L shaped cube unit on one side of the closet and the 2x2 cubes on the other side.  I chose not to screw them together in case I want to pull out the smaller cubes in the future.

I used two laminated boards, the widest I could buy, as top shelves.  I used scrap trim to make a small ledge/bracket on the side walls of the closet.   I screwed the shelves into the top of the L shaped cube and the brackets on the sides.  By doing so I ensured the unit won't tip forward.

Attach clothing bars in desired location and voila!  Plenty of space to hang baby clothes, store toys, diapers, etc.  An organized girls dream!

The best part is storage cubes from Thirty-One gives fit perfectly in these cubes!


Dreaming of Baby


I bought a new house with the plan to become a single mom by choice.  Before I start with the getting pregnant process I wanted to try a fun wall treatment in the room that I hope to be the nursery.  After reading lots of blogs on pinterest, I decided board and batten was the way to go.  Keep in mind I did this entire project by myself.  I never had an extra set of hands to help so don't be afraid to tackle this one on your own!  Girl power!

Supplies/Prep:
  • Air compressor and nail gun - trust me - you want a nail gun!  I bought them together in a starter set.  Don't forget to purchase brad nails for the gun - the set comes with some, but I needed another package
  • Miter Saw - I'm a DeWalt fan and have the DW713.  You can find it here.  It's very easy to use.
  • Caulking and caulk gun
  • Paint
  • Measure all of your walls and decide how far apart you want your vertical boards to be.  I wasn't exactly sure what I wanted but knew somewhere between 12-18 inches would be perfect.  Figure out how many vertical boards you will need for each wall.  Keep in mind you want to avoid any plugs for simplicity's sake.
    • I did not use flat boards behind the vertical strips which would have made it true board and batten.  The texture isn't too deep on my walls and I didn't care that it wouldn't be completely smooth. 
  • Decide the height you want your chair rail.  Measure the distance between the bottom of the chair rail and your baseboard.  That is the length you will want your vertical boards to be cut. 
  • I used lattice boards for the vertical boards - they were the perfect width and the cheapest thing available at the hardware store.  I had the store cut ALL of my vertical boards to the correct length.  Keep in mind, your boards will be close in length but off by up to .25 inches.  I'm a perfectionist but decided this route was much better than me cutting each board individually.  Plus, it made it easy to put everything in my car!
  • I used 3 inch molding for the chair rail.  I debated putting a ledge on the top of the rail but decided against it.
Get to work!
  • I had to decide exactly how far apart to put my vertical boards so I laid them out on the wall in varying distances.  15 inches turned out just perfect to avoid all of my outlets and work well with the corners.  Keep in mind that the actual distance between the sides of the boards is actually less than the measurement if you take into account the width of the boards.  Cut a piece of scrape wood to the correct measurement and use it as a spacer. 
  • Because I was working alone, I put up the vertical boards first.  I used the spacer I made to place the bottom of the board and a level to make sure it was straight up.  A 3-4 nails in each board is all you need.  Because the windows are opposite of the door I started the vertical boards there to make sure they were centered on the windows.  I put 4-5 nails in each board.
  
  • Once the vertical boards are up it's time to do the chair rail.  The vertical boards make this super easy - just put the chair rail on top and the level on top of the chair rail boards.  Start nailing away.  You will need to make mitered cuts in the corners, if you aren't sure how to do that I suggest a little research - it was my first time mitering and it was fairly simple.  I do have to angles in this room that were tricky and took some trial and error.


  • The process that takes the longest is caulking and puttying.  I put putty over all of the nail holes and caulked all the edges of the vertical boards and chair rail.  Don't skip this step- it gives the whole room the finished look.
  • I painted the gray first and then the white.  In hindsight, paint the lighter color first!  
I love the finished product.  Stay tuned for a post about the finished and decorated nursery!


Oak Table Refinishing


I found this great little table for just $30 on Craigslist and decided to try my hand at chalk paint.  I found that the actual painting is super simple, the waxing is a little bit trickier, but very forgiving!  Here are my step by step instructions:
  • Clean the table with warm soapy water to remove any dirt and grime
 

STAINING:
  • Start sanding - this is what took the longest.  I wanted a nice clean surface to work with because I decided to stain the top.  Because I was chalk painting the rest, I only had to sand the top. 
    • Start with a course grit and work your way down to very fine.  I used an orbital sander similar to this one.  I also used sanding blocks similar to this one from 3M.  I love these because they really get in the nooks and crannies.  I especially liked how it work around the edges where I didn't want to sand off the detail, but needed to get into the corner.
  • I discovered that my table was not solid wood when I hit MDF.  Don't sand that far!  I was able to cover it up with stain but it did create a lot of extra work.
  • Once I was finished sanding I used tack cloth to clean up the dust and was ready for stain.
  • I selected Minwax wood finish in the darkest color I could find at my local hardware store.
  • Apply stain following the instructions on the can.  I had to let extra stain just sit in the MDF spots which was super stressful but in the end it turned out beautiful.  I lost track of how many coats I did of stain - I wanted the table dark!
  • I chose to use Lacquer on the top instead of polyurethane or varnish mainly because it resists water rings.  I'm using this table in the casual dining area and don't want to ever worry about the finish.  I did 3 coats of clear lacquer on the top and then got to work on the chalk painting!
First coat of stain
I just kept adding more coats of stain until I got the color I wanted.


CHALK PAINT:

I do not claim to be an expert after just one experience.  I'm listing what I did but I highly recommend reading through some blogs that have a lot better tips and pointers.  I found this one very helpful.
  • I chose Annie Sloan paint in antique white because I have heard so many good things about the brand.  It is a bit more expensive than others available, and I don't know if it's really worth it because I've not used anything else.  I will say, I love the results.
  • Painting was very simple and the coats dried quickly.  I only did 2 coats and thought it was covered well.  I used a natural bristle brush for the paint and it covered smoothly without too many brush marks.  Any marks were covered with the second coat of paint.  
  • Wax - I also used Annie Sloan clear wax.  It goes on simply enough following the instructions on the can.  You really have to work it using small amounts, otherwise it gets sticky.  I used a plastic knife to take out some wax which is the consistency of crisco.  I then used a wax brush to dab into the wax and spread on the paint in circles. 
    •  I apparently used too much wax and even after buffing was left with a sticky table.  The instructions on the can said to apply more which would soften the already hardened wax and allow me to rework it.  I followed the instructions and was left with a less sticky table.  I definitely learned my lesson - less is more with the wax!  I finished the table a year ago and it's still a little tacky but doesn't seem to be attracting dirt or anything. 


After first coat of chalk paint - a little streaky
All in all I love how this table turned out and everyone compliments it when they visit my home.  Super simple and easy!


Monday, May 23, 2016

Window Frosting


For some strange reason, having clear front door windows was an upgrade on my new house. Sadly, I bought the house once it was completed so it was too late to change this. My solution - spray paint frosting. I knew from experience that contact paper type frosting is next to impossible to apply well. I'm a perfectionist so the edges need to be clean and wrinkles will drive me insane.


I used Valspar brand Frost spray paint but you use a different brand like this one.  I taped off the windows and used newspaper on the ground around the windows for overspray.  I ended up using 3 coats per window to even out the lines.  I only did the inside of the windows  I was happy with the coverage and viewing from the outside the paint looked smooth. 


I did the same technique on the windows in my garage.  The paint lets in plenty of light but provides for privacy.  It's been about 11 months and I do now see in the garage the paint has cracked.  You have to get close to see the cracks and my guess is because of the fluctuation of temperature.  I actually like the way it looks.


I haven't ever tried to clean the frosted portion and my guess is it would cause streaks/damage to the paint. 


View from the outside

I love how good it looks!